|
|
|
|
|
|
|
2007 Blog (Read bottom up)
12/23/07
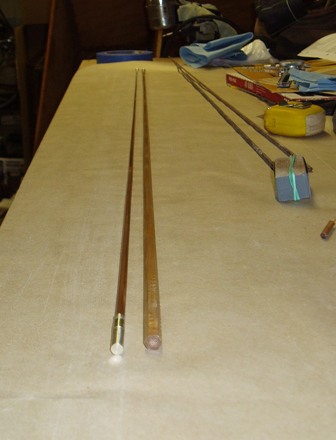
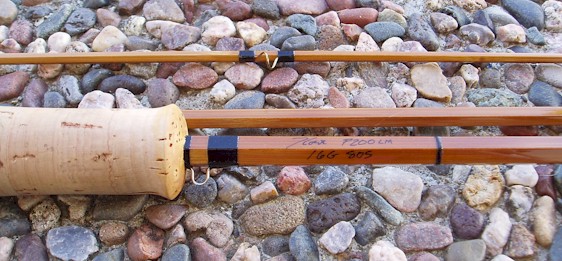
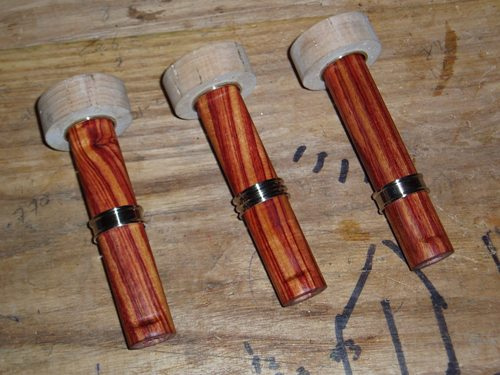
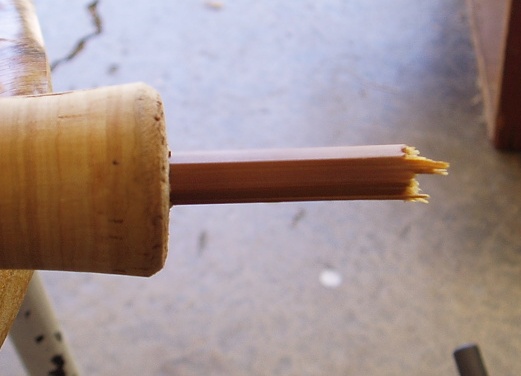
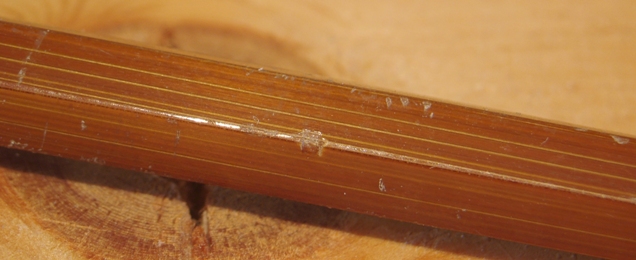
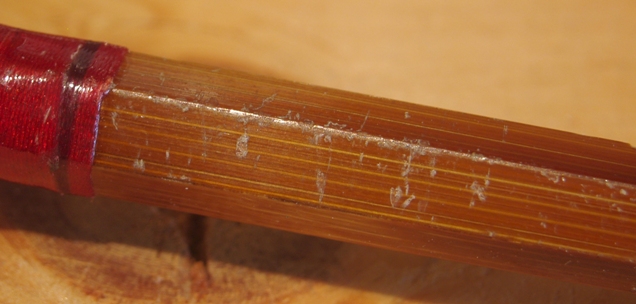
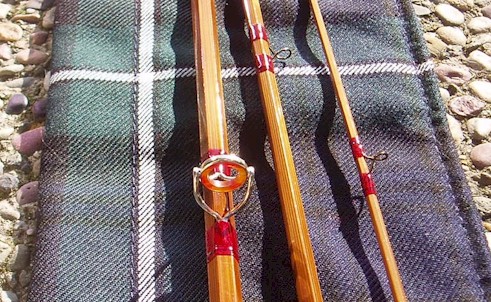
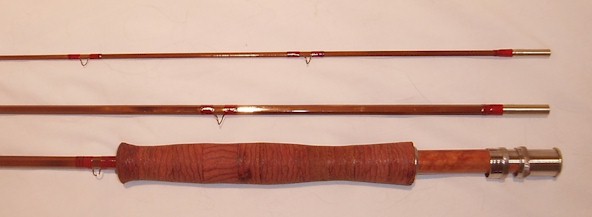
Back to working on the Payne 97. The replacement butt section turned out a tad too light. Here's a picture of the new butt next to the tip.
The solution of course is to darken the new butt somehow. There are several possible ways to do this, take a flame to it again, ammonia toning and dyeing.
At this point, on a finished section, flaming might be a bit harsh. I'd risk over tempering the rod at best and turning it into a match stick at best.
Ammonia toning is an option. It entails hanging the rod section in a tube above a cup of ammonia. You leave the tube in the sun and the fumes darken the cane. This would probably be a good option in summer but I didn't think it was the way to go.
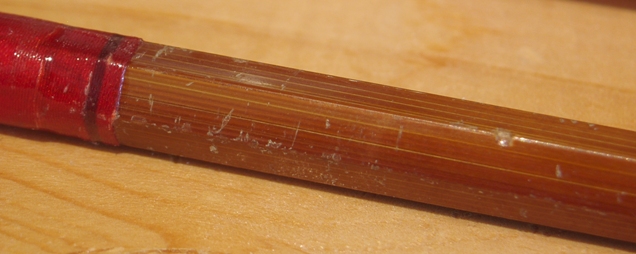
That leaves dying. I've used dye before, potassium permanganate to be precise and haven't liked the results. Fortunately, my rod making friends came to the rescue and I was able to use a different substance to dye the rod.
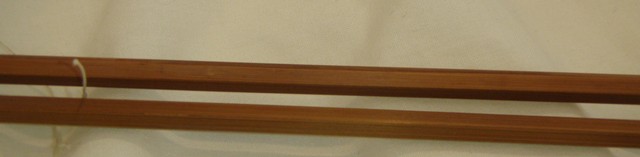
Here is the original butt section above the newly dyed section. It looks like it should be a pretty good match once I get a little varnish on it. I'm going to let it dry for a couple of days and then start working on the grips.
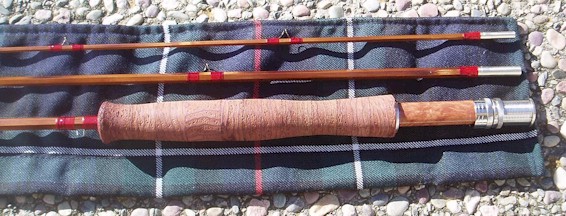
On another plus side, it looks as I've been able to salvage the reel seat from the original rod. 12/22/07 Well, Rod #16 should be in the hands of a new owner by now.
I can't really say that I'm happy with it. Before shipping I noticed a small tick in the ferrule when wiggling the assembled rod. Something every rodmaker hates to hear. It was fine when I finished the rod back in September. The nearest thing I can figure is that the glue I used on the ferrule shrunk, leaving a small gap or perhaps the ferrule didn't seat all the way. Since the rod didn't seem to tick while casting and it's a Christmas present, I sent it anyway with full disclosure to the follow presenting it as a gift. I'm not real happy with that decision and hopefully, if it becomes problem I'll get the rod back. I still ask folks to sell my rods back to me if the don't like them. 12/09/07 I've dipped the second tip on the 200. I'll let it dry for two days before wrapping. the guides and then dipping a final time. I've also been experimenting with some dyes for the 97. 12/03/07 I've cut the butt of the 97 to length. It's a tad light so I'm going to have to dye it to match the tips. That'll take a while so I'm going to knock out the tip for 200 this week and then start playing around with different dyes. 11/22/07
Well, I took the finished 16G Modified Payne 200L out for a spin today and I like it. Shane wanted a 4/5 wt rod and it casts both fine. It's a 5wt but like all the Payne's I've made so far, it's on the light side of 5 so a 4 works just as well. That said, it is a 5wt and so I did most of my tests with that. It'll make a good all around rod. It's casts well at 20 ft but I was also able to shoot 70 feet of line with really no effort at all. I attribute that to my modification and lightening of the butt. I'm betting that down at the cast ponds I could have it out to 80ft, which I've never been able to do with one of my own rods.
That said, the craftsmanship isn't up to snuff. It'll make a fine fishing rod but I have done better. That Payne 97 butt section I destroyed was my best work yet. Ironic since they were both made at the same time. I found out yesterday that there's almost no snow in the Emigrant Wilderness and that Tioga Pass is still open. What's a high country fly fisher to do? I can't pass up this late season opportunity, especially after the last 4 weeks I've had at work so it's so long rod work and hello high elevation lakes. Despite that, I've only got to more splines left on the second tip of the Payne. So glue up is looming. More pics are posted on the pic page.
11/21/07 A funny thing happened yesterday. Not funny "ha-ha" but funny "hummm". I cut myself on my plane blade. The funny thing is I didn't feel it. I was sharpening the blade, looked up for some reason and momentary forgot I had the blade in my hand. While doing so I somehow tapped my thumb on the top of the blade and cut myself without feeling it. I didn't feel the blade at all. I realized what I was doing and sure enough, two quarter inch cuts. They're not deep but the fact that I rested my thumb on the blade and DIDN'T feel it is astounding to me. Anyway, I've planned 3 strips on the last tip for the
200 and it looks like I'll be gluing everything up over the weekend.
This is the part that makes me nervous, tips are so easy to screw up.
They tend to curl up at the end as you get down to final dimensions and
if your concentration wavers a bit- "snap"! Broken tip. 11/15/07 No glue but the 200 is varnished and sitting to dry. It looks pretty good, so considering all the little things that went wrong with this rod, I'm pretty happy. 11/14/07 The glue hasn't arrived which is somewhat surprising. I've finished the wraps on the Payne. The re-wrapping was worth it, it looks much better. So far no pruning, that's a good sign. I think I'm going to place an over coat of varnish and then rub it out a bit. I still have to make the extra tip but I basically consider this rod done.
11/09/07 AM I've started to work on tip two and have decided to make some modifications to the tip. I've decided to beef up the last 5 inches and smooth out the transition at the ferrule. I've also move the transition point on the tip from 5 inches to 10 inches. I'm hoping this all results with a little more feel of the line during the cast. Meanwhile, I've put 4 layers of finish on the new wraps for the 200. I'm letting the last layer dry for 36 hours before adding another. Hopefully this will prevent the wrinkling I've experienced in the past during cold weather. 11/08/07 AM Well, no gluing last night. URAC, the glue I use has a shelf life of 6 to 12 months. My can read 11/26/06- time to buy a new can. This will set me back a couple of days. The URAC folks are usually pretty fast. If I order it early today, I might have it by Saturday afternoon. In the mean time, I'll start working on another tip for the 200. 11/07/07 AM I'm done with final planing on the butt section of the 97. Tonight I'll glue up the 97 and the second tip for the 200 I made last year. I'm hoping I can use that tip as the second tip for the second Payne 200. We'll see if the color tones match. If not, I'll have to start planing another tip this weekend. I am a little concerned that the butt section I'm planing now will be too light for the tips. I'm crossing my figures that they'll match. 11/04/07 I've planed down to .005 over on 4 of the strips. 2 strips are finished. 11/03/07 I've started final planing on the the second butt section for the 97 and rewrapped the 200. If I'm not bogged down with work again. I should have things glued up by next Sunday.
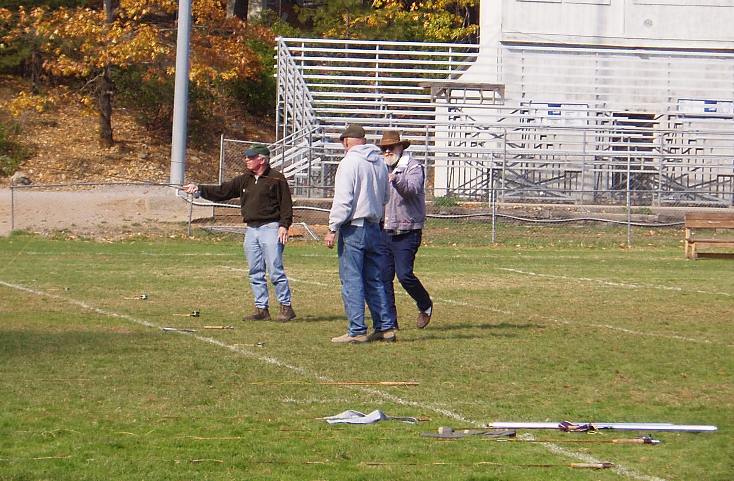
10/28/07 I spent most of Saturday on the football field at the Dunsmuir City Park casting rods. Jerry Foster, of Rodmakers fame, had taken the initiative to come up with a program for this years gathering. Chris Raine, who has organized the gathering since Chuck Irvine gave it up several years ago, has had to concentrate on his health and consequently wasn’t going to host this year. Enter Jerry and Dave Roberts, a fishing guide from Oregon and the fellow doing the amazing cast on the cover of Oregon Bamboo. Jerry created several experimental rods for this years gathering and using his CNC machine, he was able to put out eight rods in the time it take me to finish the prep work on one. The CNC machine is an amazing contraption. Through the use of a computer, a taper can be input at one inch intervals (if desired) and each strip cut in a matter of minutes- passes through the machine cuts a finished strip. Jerry brought with him 3 sets of rods. All the rods were 8ft 5wts. The first set were straight taper rods with the rod stresses calibrated at 185, 200 and 225. Stress is what rod makers use to relate one rod to another. Basically, the higher the stress at a point, the more the rod flexes as that point- in a basic sense you can think of the rods as medium fast, medium and medium slow. It was a great exercise. Initially I found myself drawn to the 185 rod. It was responsive and extremely easy to cast, especially in the wind. The 200 was easy as well but didn’t seem as powerful. The 225 was more difficult to cast well and needed some adjustment. Being the fickle caster I am, I spent about an hour casting these 3 rods. The more I cast them the more my preference shifted from the easy to cast but more tiring 185 to the 200 and 225. Once you got the timing down. The casting with the 225 was effortless and at fishing distances would be the more preferred rod. The 200 was a good compromise between the two extremes and would make a good all around rod for the average Joe. The rods were designed so that the highest stress point on the rod was at 18 inches from the tip.
The next group of rods were identical to the 200 rod except that the high stress points, or “break” in the tip were at 5 inches and 10 inches. The idea here was to compare the 3 200 rods and get an idea of how the break in the tip affects the action. The 5 inch tip was very sexy. Immediately I was casting the tight, 5 inch high loops that I like to play around with- very appealing but probably not a good fishing tool. At fishing distances you had to put a little too much effort into the cast. My reaction to the 10 inch rod was immediate. “This is the rod”. It had taken me an hour to determine that I’d liked either the 225 or the 200 rod best but only 5 min. to determine that the 200 at 10 inches was better for my casting style than the 200 at 18 inches but I still couldn’t say it was better than the 225. The next group of rods were pretty random. These were more stylistic. One rod was semi parabolic in nature, the next was based on a straight line stress curve and the last, was as Jerry says, “as soft as he could make it.” I immediately liked the semi-parabolic rod and why not, the thing was a cannon and I do so love to double haul. I picked the straight line stress rod up and put it down almost as fast- extremely unexciting. Then I picked up the “slow” rod and immediately had to do a double take. “Jerry, Is this a 5?” I shouted. He nodded his head. It felt in the hand like a 4wt and laid out line like a 4. “Wow”. It was a little on the soft side, but the weight distribution was really something. Returning home, I immediately set about designing a taper which the best characteristics found in Jerry’s rods- a 10 inch breakpoint, a max stress of around 215 and a softish butt. I cast several more rods that day, a well made Payne 102, Young Para 14, a couple of Winstons, a Reams rod, a couple of 8 sided rods Jerry made. I liked the Payne. Like most of the Payne’s I’ve made it seemed to feel overlined as I let out more line. This was nothing a good haul couldn’t fix and I left feeling that the 102 would make a fine all around 8ft 5wt. I liked the Para 14. I don’t recall who made it or really much about it other than that it would make a good rod. Jim’s rod was nice as always. It was little bit on the cannon side of the rod spectrum and would make a great lake rod. I don’t have much to say about the Winstons, I’m simply not a Winston guy. I don’t know why but Winston’s have simply never impressed me. I’m not saying I could do better. I simply haven’t cast a great Winston taper yet.
10/23/07 All the splines are prepped for the next batch of rods. Rod building this week has been interrupted by roof building. We had a leak on the side of the house, several in fact, so I'm replacing the whole thing. Should take me the rest of the week. 10/12/07 I've split the splines, prepped the nodes and roughed the strips for the tips and mids of rods 17 and 18 and need to do the same for the butts and the replacement butt for the Payne 97. I should be planing the butt for the 97 and the extra tip on the 200 by Halloween.
9/24/07 I've been lazy in posting but that doesn't mean I
haven't been working. I completed wrapping and finishing the 200LM only
to start the processes over. I couldn't get rid of all the fuzzies and
the weird weather meant that the finish on the wraps did dry properly.
I'm starting over on all but the last few wraps on the tip.
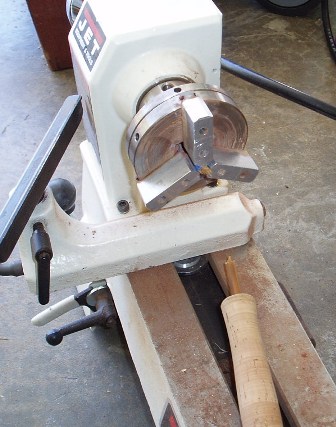
In the mean time, I've taken a breather from wrapping to make some real seats. This year I've started making rods as I prefer them; with a certain style I guess, which can be most seen in rods 1, 2, 12, 13, 14 and 15. That's a wide range of rods but each has a little of what I guess is becoming my personal "style". I really like the orange wraps as used on rods 14 and 15, the light and dark flamed cane and the "pecker head" full wells style grip on rods 13, 14 and 15. In addition, I think the burl cork as in rods 2, 12, 13 and 15 has a nice look. Though I've only used it once, the Tulipwood reel seat on rod one has always been my favorite. I also like the maple burl seat on rod 12 but I think that may be hard for me to find and thus duplicate. I like the idea of a duel slide band reel seat that I have on rod 8. It gives the individual a choice on whether to lock the reel seat up or down, thus affecting the weight distribution. At this time, I've got a bit of work before I can start producing seats in my shop. The first set of slide band hardware I produced seems a bit heavy; I need to work on lightening up the seats if I'm going to go the duel sliding route. The tulipwood itself is heavier than other seats. I don't own a metal lathe. I turned the seats and hardware at Erik's house and was amazed how much easier it was than on my wood lathe. Erik showed me his process for making seats and will give me free use of the lathe when I need it. I'll be able to turn the wood at my place and then follow that up with a trip to Erik's.
So what will a "Jim Lowe" rod look like? Probably a lot like rod 15, with the handle of 13 and home made duel sliding reel seat. I still need to work on my grips. I actually like the grip on rod 13 the most. It's the most comfortable for long term fishing so that's what I'll strive for. I haven't made a decision on truncated versus step down ferrules. The truncated ferrules weigh less but I've not done a side by side comparison as I have with the step downs and standard. Tomorrow, if I'm not playing Halo 3 :) I'll finish the seats and start working on a new batch of rods.
09/10/07
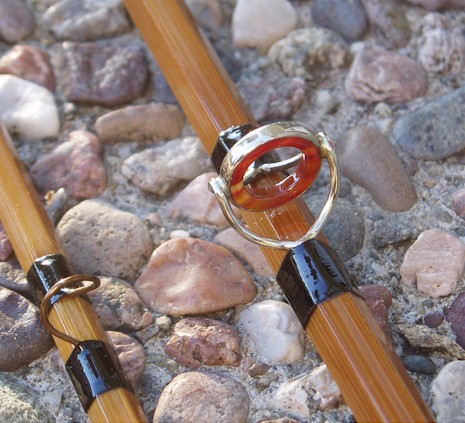
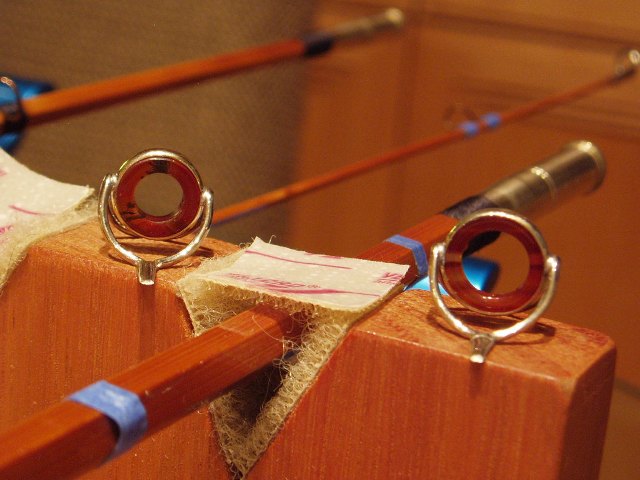
I finally got the new stripping guide in. It's not as dark as I would hope. I was hoping for dark reds with browns and some blacks but instead is reds and oranges. I've wrapped the rod and given it 3 coats of varnish thinned 50%. The silk has the worst case of the fuzzies I've ever seen. I'm not sure what the cause is.
09/07/07
I've had quite a dramatic last few weeks. The result of which has been a nice 2 days stint in the local hospital and zero rod making for several more weeks. Fortunately, I can still wrap rods so I've almost finished wrapping the 200. I'm still waiting on the stripping guide and I won't add finish to the wraps until I've been able to include it.
08/18/07
I dipped the rod 3 times this week, with sanding in between coats. I took the rod down to the casting ponds and my impression has changed. I'm not sure why, but the rod feels slower now and more like what I expected. I'd call it a solid WF5 now and I liked it with both a WF5 and TT5. It was fine with a DT5 or DT4 as well.
So why the change of heart? I don't know, the rod just felt different down on the casting ponds. Perhaps my guide placement was different than before or the shorter guide feet made a difference. Snake Brand guides come pre-shaped and most guys simply use them as is. I shorten the feet about 1/3 to 1/2 of their normal length. When I test cast the rod the other morning I hadn't made any changes yet. I also hadn't removed the string I use for binding the ferrules. It seems unlikely but maybe the shorter guide feet and lack of string at the ferrules made a big enough difference for me to feel. In any case, the rod now seems spot on.
I've ordered a new stripping guide from Snake Brand. I couldn't get a hold of the Goldenwitch guide. Wrapping should go quickly as there is no tipping.
08/13/07- 11:30pm
I dipped the 200L tonight, which I've marked on the rod as P200 LM so that I know it's a modified taper. With the last couple of rods, I've been getting runs in my finish. I've figured out what is causing it and it should be easy to fix.
I may have burned out dipping motor. I hope not. Instead of turning the motor off while the rod was soaking in the tube, I left it in neutral which stops the motor from running but apparently isn't a good thing to do as it wouldn't turn back on again after an extended period of time. Hopefully it's simply over heated.
I had to extract the tip section by hand and I suspect this will leave a heavy finish on the tip. I'll probably have to sand all the finish off of tomorrow.
08/13/07 - 7:00pm
I test cast the 200 before work this morning. It's a solid DT5. It's not the 200L that I had cast at the Great Western a couple of years ago. I guess I'll need to keep searching for that taper. It should make a good transition rod, that is transition from graphite to cane.
It's more different from 200 than I expected. The faster mid really makes a difference. I think if I were to make it again I might take it down half a line or hollow it out. I seem to be drifting away from DT5s and moving toward WF5s. We'll see how I feel once I get it down to the casting ponds. I suspect it will rock with a TT5.
08/12/07
Well, I shook off Friday's disaster to get some good work done on the 200. I've been calling it a Payne 200 but it's really a 200 L which I've converted from a 4wt to a 5wt and then softened the butt. Rod 14F is a true Payne 200 and is softer throughout. The Payne 200L has a faster mid and a slightly faster butt. I've slowed the mid down a hair and the butt slightly less than that. I think it should be a good rod.
The grip has been turned on the 200, no mishaps this time. There's a slight glue line on the cork but I think it should be ok. The ferrules are glued and later this afternoon I'll turn them down. I might be casting it as early as this evening. The original stripping guide is supposed to be red agate but, since the overall motif of the rod is brown and black, I think I might order a new stripper. Goldenwitch has a stipper called the espresso and beans. With any luck I can get someone on the rodmakers board to part with one.
08/10/07
Stick a
fork in me......I'm done. 40 plus hours of work and $100 plus dollars of
rod went flying in the air today, leaving me no choice but to start
over.
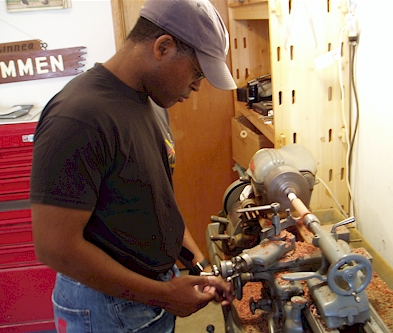
First thing this morning I taped some guides up on the 97 and took it for a spin in the driveway. It cast fine as a 7.5 rod. In fact, I preferred it to the Payne 100. Regardless, I removed the ferrules, which was a pain but confirmed that the golf shaft epoxy I use is good stuff. It took me over an hour to remove the ferrules from all 3 sections and it required lots of heat, a bench vise and my full body weight plus the strength of my legs. No problems, I cut the sections to length and then decided that I was going to take the grip down a tad. It felt a little large during casting.
So, into the lathe it went. I didn't cinch up the tail stock right away, I wanted to check the ferrule end to see if I needed to make any adjustments. I turned the lathe on but held my palm to the side of the grip to control wobble and before I knew it the last foot of the butt section went flying into the driveway. It had sheered clean off. I used two ton epoxy to glue the reel seat on and it appears to want to stay. I couldn't get it off with dry heat. Maybe I'll boil it but my experience has been that once glued, it's hard to reuse a reel seat.
I don't have enough cane ready for a butt section of the same color so a new butt will have to wait until I've roughed some wood for my next batch of rods..... So much for the excitement of nearly be done. At least I had a chance to test cast it first. Too bad. The nodes on the butt were some of my best work......
08/09/07
....and things were going so well. I glued up the ferrules on the 97 tonight and was rather pleased and admiring my work when I noticed that each section was 3 inches longer than the rod standing right beside it, which; unfortunately, is also a Payne 97. Oops. I've cut the sections too long.
It should have been a no-brainer really. The entire time I was planing the rod I knew the sections had to be 42 inches long but when I went to cut them I had convinced myself that the total rod length was supposed to be 90 inches, which means the sections needed to be 45 inches each. I thought this strange since I usually leave some extra wood on the strips and they were exactly 45 inches long. Relieved that I caught my "mistake" before I cut the blanks to size I went ahead and cut and added ferrules.
Of course a rod of 7 feet, which the Payne 97 is, is 84 inches. I'm going to have to cut 3 inches from the bottom of the tip and close to the same off the top of the butt section. I'm also going to have to order new ferrules since the correctly cut pieces will require a size 12 ferrule and not the 13 I'm currently using. This will put me back about two weeks as I'm going to have to order new ferrules from CSE. Who knows when I'll get them.
On the upside. I can lap the ferrules tomorrow and check out how the taper casts at 7.5 feet. :)
08/08/07
The Payne 97 is coming along quite nicely. The blanks are cut to size and I've installed the grip and handle. I should probably install the ferrules tonight but will probably wait until the weekend. The first 3 sections of the 200 have been glued and are hanging.
The measurements for the tip are almost dead on. The butt ended up a little heavy, yet again, but it should be ok. The butt for the 97 is light anyway, more of a 3wt butt on a 4wt tip. This should even it out a bit. I still can't figure out why my butts keep coming out a tad large, especially when the sections are dead on before gluing.
08/01/07
I made some pretty good progress on the current crop of rods. I'm a bit surprised but I guess my efficiency in planing has picked up and I knocked out the second tip of the Payne 97 pretty quickly. The first 3 splines of the tip for the 200L followed. I could probably have knocked out both full tips by now but instead I decided to glue up the 97. It's hanging to dry now.
I thinned my gluing mixture a tad. I still used the walnut flour but only used a 10/100 ratio and not my standard 13/100. I sifted the ammonium chloride out of the extra 3 grams and included it without the flour. This should give me the same strength without as much fill. Once I get done with this batch of rods I'll switch to gluing without the flour.
07/29/07
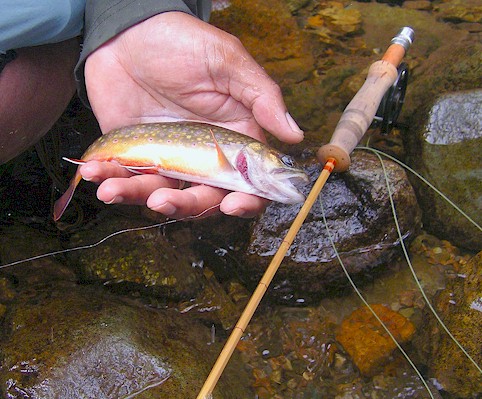
The fellow I fished with in Va. sent me a picture of my first brookie in Shenandoah National Park. It turned out to be a pretty good picture of rod 15. I'm really starting to like orange as a wrap color on both the dark and light rods.
07/23/07
Sunday was my first time back into the shop in quite a while. I've now finished the tip and butt on the Payne 97. Normally that'd be a good thing but since I agreed to make 2 tips for this rod, I'm not finished yet. Ironically, if both rods were only 1 tip I'd probably have them done by mid August but I really hate 2 tip rods so the motivation's not there to finish them anytime soon. I'm guessing that I still have 20 hours of planing to do on both rods.
07/21/07
I'm back. The SNP rod worked like a charm. It's a bit stiff though so I think I may keep on tweaking the taper. I fished it for a week and caught plenty of small Brookies. Unfortunately, it's suffered the same fate as the Payne 200; namely, it now has a nice dent and plenty of deep scratch marks due to a heavy fall I took. The dent is nearly identical but the scratch marks are much deeper.
07/05/07
The SNP rod is officially finished. The wraps near the winding check could use another coat of finish but the other wraps are ok and since I leave tomorrow, I'm going leave it the way it is. The new silk seems to absorb the finish more than the old. The wraps took 4 50/50 coats and 3 75/25 coats of varathane 900.
When I get back, I'm knock out rods 16 and 17 and start on some high country rod ideas I have. 15 is so fast in the mid I should probably rework it, we'll see.
07/2/07
Erik and I took some rods down to the casting ponds this weekend. I was casting like crap which, unfortunately, is to be expected after a week of casting in my driveway. Adjusting my stroke to avoid the powerlines always causes me problems. I go to the casting ponds to gage the rod and determine the stripper position which means I have to be able to feel the action. We'll I couldn't feel the rods on Sunday and when I switched to different rods I was throwing a terrible line.
Fortunately, it wasn't a total waste of time. The rod is a little more stiff than I would have liked, I can't feel the reverse drop in the butt, so I'm going to have to continue with that experiment and place a reverse drop on another rod. That said, it actually performed as designed. Namely, it casts tight loops close in to 20 feet. Casts OK from 25 to 45 feet but will shoot line out to about 70 feet. That's precisely what I wanted.
I do need to finish that extra tip. Erik said the last 4 inches of the tip was really flipping over. This makes sense since there's a .01 to .015 drop from 5 inches to 4 inches but it also means it might break. We'll see. If it survives the next week I'll be happy. I'll just have to remember not to stress it too much while landing fish.
Overall, I spent about 2 days trying to determine the guide placement on this rod and nothing was really definitive. I started with my usually 8 (7 guides and a stripper). Then went to 9 to see if it would help the rod shoot more line. It didn't seem to. At the casting ponds I lost a guide so I tried 6 guides and a stripper and that was terrible. The line was sagging and slapping the rod everywhere. I decided on 8 and wrapped and varnished the wraps last night.
Every time I make a rod for a trip east, I'm rushing the finish. The last rod I made for a family reunion, I actually made in a day. I brought the graphite blank, thread and guides with me and wrapped the blank and put one really thick coat of flexcoat on the wraps before fishing the rod the next day. Ironically, that rod turned out to be one of my favorites and saw a lot of action.
That's what I'm doing now. I didn't spend as much time in the shop yesterday as planned, so I decided not to add tipping to the wraps. Only the ferrule wraps have tipping. I put two coats of 50/50 Varathane 900 on last night. I'll add an additional coat Monday , Tuesday and Wednesday night and let the rod dry Thursday before packing it up for my trip Friday.
Do I feel rushed? You bet I do. I'm having to cancel a Golden Trout trip on Wednesday so that I can work on the rod and tie flies.
6/29/07
The hand wiped varnish idea didn't work. The Epifanes attracts more dust than the tung oil did. There are dust particles all over the rod and I can't get rid of them. I'm dipping the last coat.
06/27/07
I test cast the SNP rod a couple of nights ago. It casts fine despite the mishap with the tip. 3 days of hand wiped varnish and then it's off to the casting ponds. I'll have the wraps done and the rod ready to fish by the 4th of July.
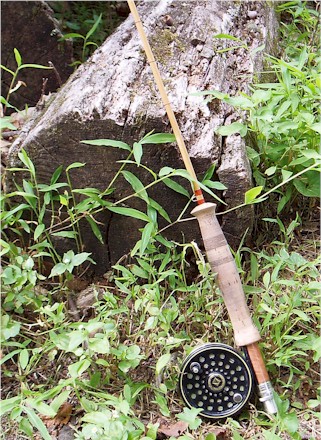
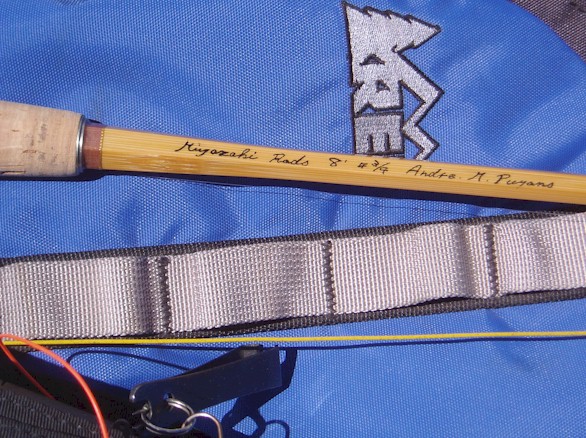
I fished the Miyazaki rod last weekend. I made a great high country rod, especially in the wind. The butt's a little heavy but overall it was a good, comfortable rod to fish with. It handled the wind and roll cast well.
6/22/07
Well, over all it's been a good week. The grip on the SNP rod has been turned and the ferrules installed. 4 splines on the Payne 97 have been finished I need to start thinking about guides and placement.
6/18/07
I practically destroyed the tip on the SNP rod on Sunday. I was doing some sanding and picked up the wrong grit; before I knew it I'd gone from something like .073 to .060 in less than 1 inch. It's not a huge problem, I've got a second tip all ready for final planing.
I've had two solid nights in the shop. Last night I prepped the second tip of the SNP rod and the first tip of the 97 for final planing. Tonight I planed 3 strips of the 97 to final dimension.
Yesterday I glued up the grip on the SNP so it looks like tomorrow I'll work the grip and ferrule stations. If I have time I'll even glue up the ferrules and real seat. I could be casting the rod by Thursday but Monday is more likely. I'm heading out to Saddlebag this weekend so no rod work.
6/16/07
I started on the tips of the 97 today and scraped the glue off the mid of the SNP rod. I'm pretty pleased with the way it came out. The blank is dead straight, even with the 3x3 node spacing I used- that's a first. I switched to the Garrison spacing simply because I was getting straighter rods with it. Now it looks like I'll have to build up a set of rods with Garrison, Payne and Leonard spacing and see which one makes the better rod.
6/14/07
It's been a non-eventful month as far as rod making goes. I gave the 200 a good work out in Mammoth the week of memorial day. It's a good rod but the grip is uncomfortable for long periods, it's too long and my hand started to crap. It's still cramps when I cast other rods. I got to think a lot about the rod's deficiencies as a high country rod and have, what else, come up with an experimental high country taper. If I'm lucky I'll get to work on it before October.
I broke in the new JW binder tonight. It's not quite the wunderbinder I imagined it to be. I still had some of the same problems that I had with my home made binder. The cradles are better so that's a plus but I don't yet have the proper technique. The Urac is really starting to bug me. It just gets so darn tacky during binding that it makes me want to take off my gloves and do everything with my bare hands. Of course, being a urea glue that wouldn't be a good idea but once the gloves touch the glue, everything sticks to it- binding cord, binding belt, razor blade, everything. It makes it hard to tie knots and wrap the cord and the glue just gets tackier the longer I take.
Anyway, the SNP rod is glued up. It's a little twisted I think but we'll see. I'll probably scrape the glue of on Monday or Tuesday and cut it to size. I could have the grip finished and ferrules installed on Saturday and then it would simply be a matter of installing the real seat and wrapping. I haven't given much thought to a color scheme yet. The rod is blond and that's not really my bag so I'm not sure what I'll do yet.
5/08/07
Still slow going but I'm at the half way point. All the butts have been planed. The mid on the 200L has been planed and I'm working on the SNP rod.
4/14/07
Things have slowed a little on the rod front. I've been neck deep in work for the past few weeks and since that pays the bills.........
That said, I'm done with the butt section on both rods 15 and 17 and have set the taper for 16. The new forms are working well. I've decided to sell the Lie-Nielsen plane. I just don't like working with that rodmaker's grove. It makes it difficult for me to gauge the balancing point on the forms.
On a sad note, I did some bass fishing a few weeks ago and trashed the finish on the Payne 200. How'd I do this? Easy, I put a bare rod in the back of a quad without bag or tube. The quad rack had some gritty debris and all the bouncing around scratched up the finish and actually put a dent in the cane.
3/24/07 4 splines to go.
3/23/07
Well, finally done with node work. Each spline might need a little work when I get to final planing but things are good for now. I've got about 10 pieces left to rough and then I can continue on with final planing. I've been trying the soaking method that a lot of other rods builders like to use. It's incredibly easy to plane the strips while they are wet and this is great for roughing. I'm roughing by hand because it's just as fast as the rougher. I tried putting the wet strips through the rougher. I didn't get any burning but it did dry the strip out and wasn't any faster than roughing a dry stick. Doing node work using a heat gun on the wet stick wasn't any better than steaming the nodes on a dry section. What was much better is steaming the wet node. The cane because pliable almost instantly.
So I've adopted some new methods that seem work so far. I've also started "displacing" the nodes, that is pressing the nodes in a vice which has a small notch for the node ridge. It essentially flattens everything but the ridge and then you simply sand the ridge off.
3/18/07
Erik and I used a new method to heat treat the cane yesterday. I wasn't able to rough out all the sticks so I opted to heat treat before roughing. In addition to rods 16 and 17, I treated enough additional cane for 10 more rods. I can't talk about the new method- one of those rod building secrets but suffice it to say, Erik and I treated enough cane for 30 rods and the result was a very consistently heat treated batch of sticks with a deep straw color. The sticks feel a little brittle to me but I was able to split one fourth of a culm into a 1/4 inch stick and completely bend it into a circle and then had it spring back with pretty good force. So, according to all my reading it appears just right but does seem a little drier than when I heat treat at home.
The butt section for 16 is roughed out.
3/14/07
Well, it turns out I didn't have as much cane as I thought. I was staggering the nodes for rods 16 and 17 when I noticed that the cane had these pretty deep slash marks which made them all but useless. Fortunately, I had some cane left over from the Payne 100 rods, which are about the same color and I was able to use that cane for the mid on the 17G.
I've got all the cane staggered and cut to size but am still working nodes and roughing. I'm working toward having all the rods roughed out by Saturday morning.
03/12/07
I'm working hard in the shop, although not posting much. I've got a enough cane roughed for 3 rods and still have about a culm and a half more to rough. I'm not sure how much cane I'll end up with but it will be more than enough for the 4 or 5 rods I'm working on now. I'm still working on multiple stages of the processes at once. I've begun final planning on what will be the rod I use in Shenandoah National Park (SNP) this summer, while continuing the node work on the rods for Shane, the fellow I took to Mystery Creek last year.
I'm excited about both sets of rods. I'm excited about the SNP rod because it's a taper that came up with by tinkering with an existing Norwood taper for a 6'6" rod and then throwing in a few ideas that have been milling around in my head. The rod is designed to cast small flies in the 5 to 20 feet range, like the Norwood taper, but I've extended the rod 7 inches and plan to make the reel seat and grip 2 inches shorter than standard length, which should give me an additional 9 inches of reach. In addition, I've made the rod a 3 piece and thrown in a reverse drop after the second ferrule. This is an idea that Mike Brooks has talked about on Clark's (the internet Bamboo forum), its suppose to smooth out the effect of second ferrule on the rod action. I've made the additional 7 inches somewhat light, giving the rod a parabolic type stress curve and I've lighted up the last few inches of the tip on the rod. So I really have a new taper with no standard for comparison. Essentially, the rod has a very light tip with a heavy mid and a very light butt. I'm expecting the rod to cast well out to 20 feet without feeling parabolic. The idea is that the strong mid kills the action with less than 20 feet of line out. The rod should load quickly and I should be able to feel what the rod is doing during the cast. If I need to get out to 50 feet, the soft but should kick in and propel the line forward. That's the theory at least. I'm also planning on making another butt section which will essentially be a grip and a reel seat. The idea here is that if I need a shorter rod I simply remove on butt and insert another. It'll be interesting to see if this works or if I ended with a broken rod from too much stress.
I'm excited about the rods I'm making for Shane because, so far. Everything looks pretty good. I've got good straight cane. The coloring looks right, or maybe a bit light and the node prep is going well. The splines should make some good rods as long as I can get them roughed ok. The only unfortunate thing is that one of the rods is a 3pc and both are two tips so I won't be getting any extra rods out of this batch of cane.
My buddy Erik was over for a couple of days last week. He likes my finish and wanted to try my varnish so we dipped two of his rods last weekend. The first dipping went well but for the second dipping session, my heating light went out and the varnish didn't heat up long enough. After this experience, I'm convinced that I need to heat the varnish for a minimum of 2 hours and that sanding between coats is important. One of the things Erik liked about my finish was the flatness. I think that came from sanding.
03/03/07
There's nothing exciting on the shop front. I'm still working nodes and roughing at the same time. 15G is all roughed out and heat treated. I cooked it for 23 min. at about 325. It's funny, when I first started making rods everyone was telling me to cook for something like 7 minutes, Garrison style. But the more rod makers I meet the more folks tell me they use longer treating times. It's like the big secret no one wants to admit. Anyway, 15G is hanging to cool right now. I working the nodes of 16G and 17G with steam. It's slow but it allows me to rough and do nodes at the same time. It's amazing how easy it is to take bends out with steam.
02/25/07
I got some solid time working nodes and roughing today. I've got the shop set up so that I can steam nodes and rough splines at the same time. Seems to be working pretty well. I usually enjoy working nodes but with close to 60 splines to work, I'll be happy when I get to final planing.
I'm also starting to work on reworking the ferrules on some of my earlier rods. All in all, it's going to be a busy spring.
02/24/07
Well, I just got back from Singapore, where I picked up some rod bags. 6 bags in total for about $15.00; you can't beat it. January and February have been pretty good months. I figured out why I'm having the flaking problem when I use the potassium permanganate to color a rod. The answer was right on the Epifane's web site. Simply put, if you use wood dyes of any kind, they suggest hand Shenandoah a very thin finish to ensure penetration.
I took my new kayak and rod 14F, the Payne 200 down to Lafayette Reservoir a couple of weekends ago. I didn't catch anything but the rod performed fine and I saw some huge bass, which looks good for when the water warms up.
I've also been working on two new tapers. One is a modification of the Payne 200 that I'm making for a fellow's father. I like the Payne 200 that I made but I think the butt needs lightening up. The other is a modification of a small stream rod called the Little Willie by Bob Norwood. I extended the 6'6" rod to 7'1" and lightened up the butt. I also lightened up the tip a bit and plan to use it when I fish in Shenandoah National Park this summer. It's optimized to fish to 20 feet. In other words, it loads real quickly close in. I lighted the butt to get a little parabolic action going and hopefully it will be able to cast out to 50ft when needed. In it's current configuration it should load with just 5 feet of fly line out of the tip top.
Before I left for Singapore I began reworking rods 16G and 17G. These were the rods that I was hoping to finish before X-mas but ran into some trouble. I flamed the culms more lightly this time, there's barely any color but hopefully this will give the correct color after baking. I've still got the cane from the original rods that are already roughed so I'm going to go ahead and make 4 rods at once.
01/14/07
Took the Payne for a test cast out front yesterday. I really like it. It should make a great fishing rod. I just hope the grip holds out. I probably should have stabilized the bark first. I used an agate stripping guide for the first time. It looks nice but I don't know how it will hold up.
01/10/07
Well, it's a new year and I'll be starting on some new rods this weekend. The Payne is finished. It came out ok. If I get a chance I'll take it down to the casting ponds for a workout this weekend.
I like the way the wraps turned out for the most part with 4 coats of Varathane 900. I've been hearing a lot about the FE Thomas Special as being a pretty good all-round rod and Chris Carlin, a maker from Alaska has been kind enough to give me his modified version of the rod, which everyone seems to like. I' haven't decided yet whether it's going to be the original or modified taper I make.
I don't recall if I've mentioned it but the grip on the Payne, rod 14F is from some Giant Sequoia bark I picked up in Tehipite. It was interesting stuff to work with, it sanded down very quickly one the grip took it's initial shape. A little too quickly. It also has little poppy seed like pods that tend to flake out. The very tip has some varnish to stop the pods from flaking off.
|
|
